Soapy Swirls with Unexpected Surprises

I’ve had so much fun creating different in-the-pot swirls and spoon swirls and drop swirls in soaps the last few months! So many factors affect the swirl: distance when pouring, consistency/thickness of the soap batter, which tool is used to create the swirl, additives (like oatmeal or coffee grounds), etc, etc, etc. It’s incredible how no two swirls are ever the same, and it’s really fun to find unexpected results when the final soap is revealed!

My latest surprise came when I cut into a loaf of Frankincense and Myrrh soap. I used a lovely forest green color, some cocoa powder to create a deep brown, and gold sparkle mica, together representing the 3 gifts of the wise men. I drop swirled each of these colors into the uncolored soap batter, then I spoon swirled all of it. Look what I found in a few bars:

IMG_4896 (2)

See the hearts?! It’s a little abstract here.

IMG_4900 (2)

But, you HAVE to see the hearts here, right?!

IMG_4901 (2)

These are the same bars as above, just sitting the way they were in the mold. How on earth did I get a sideways heart in there? It’s a complete mystery to me!

How appropriate to find hearts in the soap inspired by the gifts of the three wise men?! LOVE!

Here’s what some of the other bars from the same loaf look like:

IMG_4905 (2)

Frankincense & Myrrh soap

Isn’t it amazing how in the same loaf, every bar looks so completely unique? Gotta love soapy swirls! This is just another reason that I’m completely addicted to making handcrafted soap. It’s truly an art!

If you’re into art, keep looking. These are a few of my other favorite swirl reveals of soaps I’ve made recently.

IMG_4890 (2)

Intense Almond soap made with deep drop swirls

IMG_4514

Pears & Berries soap in the raw with gorgeous wispy swirls on top. Inside that loaf is a super wispy in-the-pot swirl as well!

IMG_4416 (2)

Enchanted Apple soap with drop Holly swirls then spoon swirls and peaked tops

IMG_4443

Blackberry Sage soap in the raw with a fun top! First I used a soap comb in both directions down the mold and across the mold, then I added big loopy swirls with a single skewer.

What’s your favorite kind of soapy swirl? Hard to choose just one favorite, I know! Stay tuned for another spoon swirl reveal this week… It’s almost Soap Challenge Club time again! 🙂

In-the-Pot Swirls

I always love to take part in the Soap Challenge Club put on by Amy of Great Cakes Soapworks. I’ve missed a few months this summer, but now that school’s back in swing, so am I! And this month’s challenge was one that I’ve actually done before: in-the pot swirls. Woohoo! (If you’re interested, here’s an Oatmeal, Milk & Honey soap with a simple single-color in-the-pot swirl that I do quite frequently.) I love to learn new techniques, but it was a lot of fun pushing myself to do more with something I’ve already practiced a lot.

Thanks to this club and the Bramble Berry Soap Crafting Club, I’ve finally figured out that I need to use as many familiar variables as possible when trying something new. (I know, I know. It’s not rocket science.) With that in mind, I used a fragrance that I’m familiar with, my typical 8-oil recipe with goat milk added to the oils, and soaped at around 90 degrees. To make this a challenge for myself, I decided to use more colors than I’ve ever done with this technique, a total of 6: pink, orange, yellow, light aqua blue, dark blue, and purple. To achieve the colors I wanted, I blended lots of micas, oxides, and neons.

IMG_4012 (2)

Nearly a rainbow!

IMG_4014

Now as soap! I still had to tweak that orange a bit. It was just too brown, so I added a bit of red and yellow and pink. I had no idea how it would actually turn out in the end!

And along with using more colors, I did a double pot swirl. Just keep reading if you’re confused! 🙂

As I was planning it out, I decided it would be fun to try 2 separate in-the-pot swirls layered into the same soap to create a cool sunset effect. I split up the blues into 2 larger bowls to be the “main” or “base” colors. Into the lighter blue, I poured yellow, orange, and pink, then swirled around the pot in a spiral motion very lightly.

IMG_4015

I left lots of yellow close to the top so that it would be poured closest to the bottom of the mold.

My soap was at a medium trace when I poured that first pot into the bottom of my mold. I was hoping for a sunset look with lots of bright yellow streaks across the “sky.”

IMG_4018 (2)

The colored stripes were so beautiful that I hated to cover them up with the second layer of swirls!

Into the darker blue pot, I poured the remainder of the orange and pink soaps along with some purple. I was hoping to mimic the ombre effect of the night sky, moving from the lighter blue on the horizon into the darker blue above, while keeping the pink and orange swirls throughout the soap. I also added just a touch of yellow to the dark blue pot. By the time I got to the last few in-the-pot pours, the soap was really beginning to set up. I swirled it together lightly again, this time folding some of the dark blue soap from the bottom to the top of the pot.

IMG_4021 (2)

I left lots of pink on top to blend into the layer already poured into the mold, leaving lots of dark blue on the bottom to be poured last.

I poured this second pot over the first layer of soap in a back and forth motion across the length of my mold. I was excited to see many streaks of color rather than a muddy mess! And the dark blue finished out the night sky just as I’d planned!

IMG_4022 (2)

Does it remind you of the night sky???

I finished the soap off by dotting the top with more pink, purple, orange and a touch of yellow, lightly swirling it and adding some glitter. (Pixie Dust was the fragrance I used, and it would be sacrilege NOT to include some glitter!!!)

IMG_4035 (2)

The raw soap was really gorgeous!

Into the warm oven it went to ensure gel phase, a.k.a. bright colors.

It was thrilling to cut into this soap the next day!

IMG_4045

The first glimpse!

All of the colors are distinct yet well-incorporated throughout each bar, and the yellow really pops!

IMG_4063 (2)

I love the bright yellow, orange and pink swirls. Lots of contrast, while the top blue and purple blend well to create the sky effect I was going for.

The light aqua blue color morphed slightly into a blue-gray, and the orange turned reddish, and I love the results. I keep going back and forth about whether this reminds me of a crazy bright sunrise or a wild sunset, so I’m calling it Sunrise Sunset! It seems a bit reminiscent of Van Gogh, too. No?

IMG_4098 (2)

Every bar is completely unique, as expected with an in-the-pot swirl.

This soap was SO. MUCH. FUN. to create! It took me a while (translation: nearly 3 hours) to plan and make it, but it was entirely satisfying to complete this one. Worth every minute.

IMG_4057 (2)

Sunrise Sunset Soap made with goat milk

IMG_4051 (2)

Check out this cool sun spot! Only two bars got this awesome sun!

I’ll most certainly be playing around more with in-the-pot swirls very soon. I’ve dreamed up all sorts of ways to use an ITP swirl in conjunction with lots and lots of other techniques that I’ve learned through the club! Now to find the time to actually make all of my ideas…

A Big Batch of Soap

There’s a running theme in my soap making experience. Expect the unexpected; things never seem to go as planned! Even the best made plans don’t go as anticipated, and changes abound. Maybe it’s the excitement of making a new soap or trying a new technique that makes my brain run haywire in the middle of a batch. I’m not sure why this happens so frequently, but I’m hoping things will get a little easier with more time and experience. What’s really encouraging is the fact that no matter how many changes I make in the middle of a soap, somehow the combination of fat, water and lye still turns into soap. It’s a little miracle every time!

All of this was true in my recent attempt at making a triple batch of soap. My typical recipe uses 3 pounds of oils to make 4 pounds of soap, and I pour into a loaf mold that makes 12 bars. I recently had a large order placed, and it included 3 loaves of Oatmeal, Milk & Honey soap, so I thought I’d try to make it in one big batch. In my mind, it would be easy to measure out three times the ingredients, and it would take less time overall to get it done. Wrong on both accounts!

The first thing I didn’t anticipate was how long it would take to make the lye solution with 100% oat-milk. I made it very slowly in my usual pitcher, but it was much more difficult because of the large amount of lye and milk. It took f.o.r.e.v.e.r! I had the pitcher sitting in an ice bath, but due to such a large volume, the milk heated up quickly and turned darker than usual. Because I’d infused the milk with oatmeal, it was lumpy and soupy and very much like pudding. It was quite difficult to stir, and I couldn’t really tell if all of the lye had fully dissolved. Lesson learned: use a bigger container to make large amounts of lye solution!

After finally finishing the lye solution, I added it to my giant pot of oils a tiny bit at a time, looking carefully for chunks of undissolved lye. Lo and behold, I found a few! Oh no! I mixed and stirred and took out a few pieces that simply wouldn’t break apart and blend in. This soap will be a bit more superfatted than I intended, but I think it’ll just be that much more moisturizing.

The next thing I didn’t anticipate was how difficult it is to simply manage the weight of such a large volume of oils. Stick blending the soap to light trace took longer than normal.

Big Batch of Soap in the making

The entire tip of my stick blender was completely immersed in the batter when I tried to reach the bottom of the pot. With my current equipment, I couldn’t make a batch any bigger than this one (and I don’t think I’d want to try any bigger anyway).

I usually separate off a bit of soap to turn white, add honey and fragrance to the main soap, then do an in-the-pot swirl and pour the soap into the mold. In this instance, it was difficult to pour just a small amount of soap out of my giant heavy pot, but I muscled my way through! (I’m such a klutz; in my mind’s eye, I can see myself spilling this entire pot of raw soap all over my kitchen!) I added honey to the main soap and blended it in. After I colored the smaller amount white, I added it right back to the main pot. I was excited about how everything was turning out, going smoothly. Hubby was taking pictures for me. Life was good.

Big Batch of Oatmeal, Milk & Honey

The in-the-pot swirl was going perfectly, with nice fluid soap.

And then I realized that I’d forgotten to add the fragrance! At this point, I knew that the distinct in-the-pot swirl was out the window. I dumped in my fragrance and lightly mixed it into the soap, turning the entire batch a lighter color, with a only a few wispy swirls of white to be found. I again muscled my way through pouring the soap into three molds, then covered the top with bubble wrap and stuck them all in the oven.

Big Batch of Oatmeal, Milk & Honey

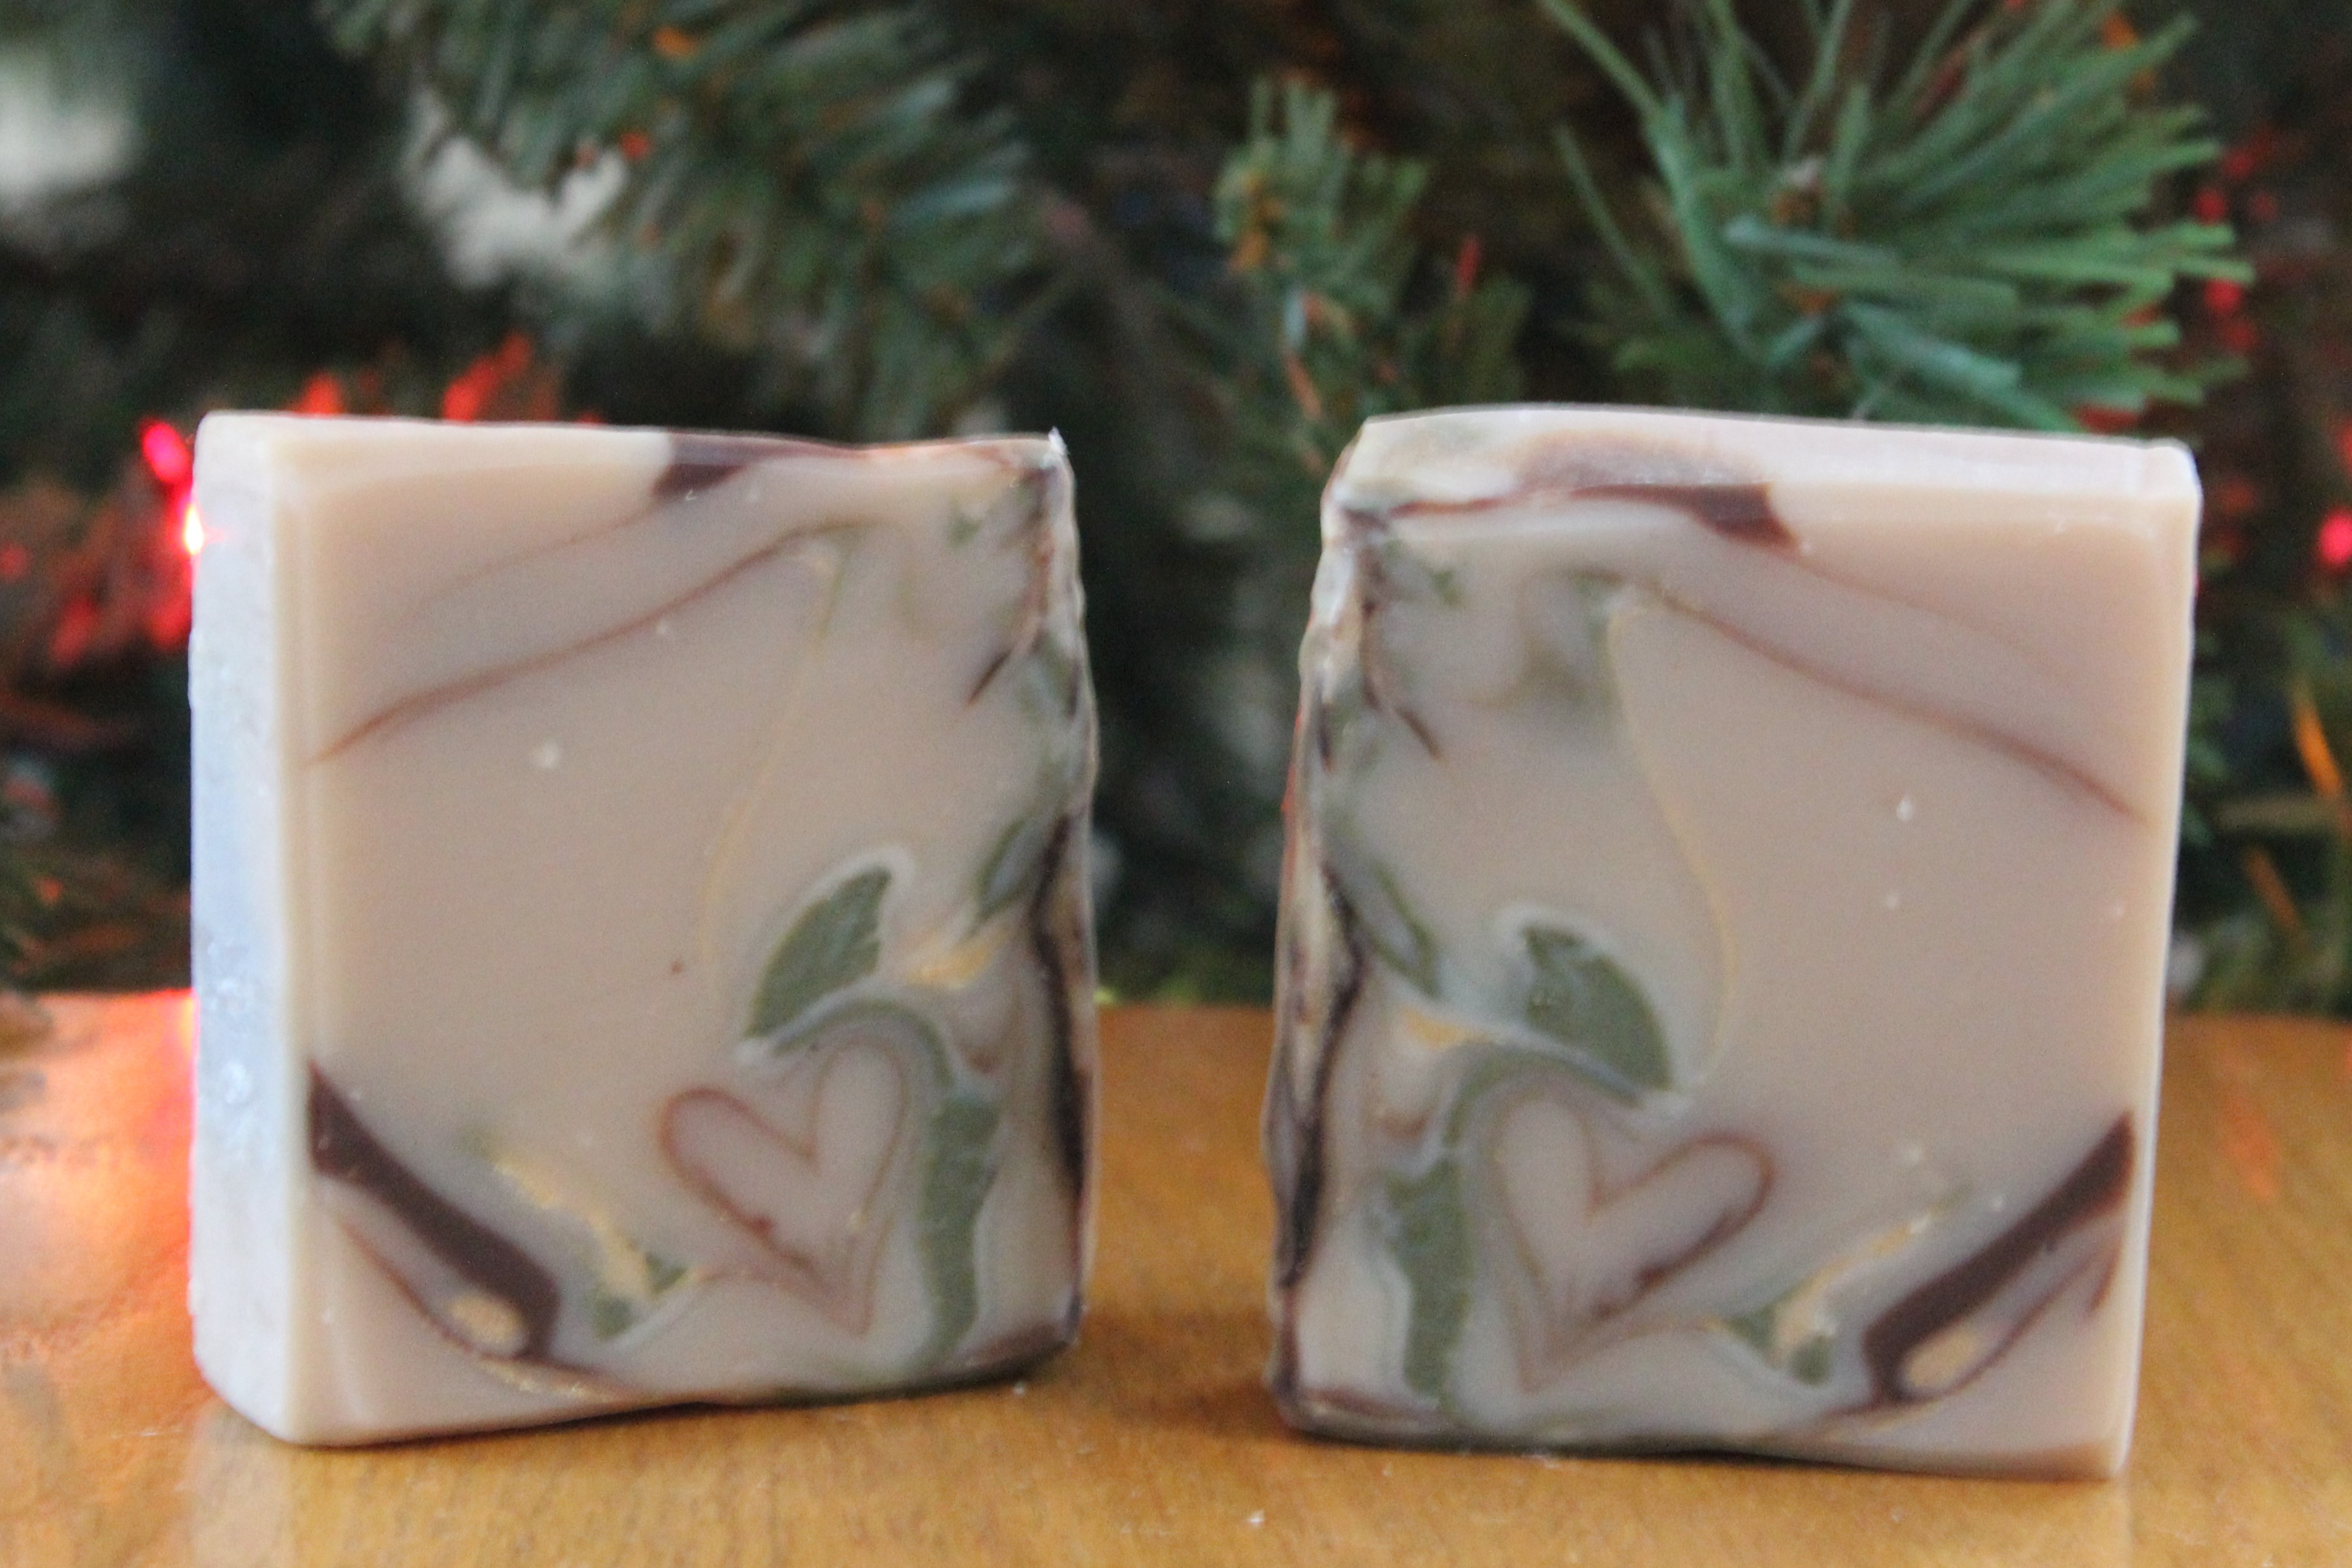
From this vantage point, you can still see some white swirls in the soap. Unfortunately, it’s not as noticeable in the final cut bars of soap.

As usual, I had no idea what to expect when unmolding my soaps the next day. Would there be chunks of undissolved lye in there, ruining the whole big batch? Would there be any swirls left at all? Did I mix the fragrance in well enough? Would it even be soap?! 

After cutting through all 3 loaves, I’m happy to report that I found no lye pockets! The pH is great! Woohoo! I did find a few tiny pools of fragrance next to small pieces of oatmeal, but they are disappearing as the soaps cure. I’m not sure if they reabsorb or evaporate out, but they are disappearing. Immediately upon cutting them, most of the bars didn’t have a noticeable swirl, but the colors are changing a bit as they cure, showing off more white! They have a nice gentle look overall.

Oatmeal, Milk & Honey (Big Batch)

See the wisps of white in there? I’m so happy that a few still came out!

I have made so many different batches of Oatmeal, Milk & Honey soap, and not a single one looks like another. Consistency is apparently not my strong suit, and I’m learning to be OK with that. It simply means that each batch is unique, individual, a small work of art. That’s the definition of hand crafted, right?

Oatmeal, Milk & Honey (Big Batch)

Oatmeal, Milk & Honey

I’m amazed at people who are able to create soaps from large batches. This batch that made 12 pounds of soap isn’t even very big compared to others I’ve seen online. And this soap isn’t too terribly intricate, either! Not lots of colors, no difficult technique. I can’t imagine trying to do a fancier soap with this much to work with! I think I’ll try about 8 pounds next, but it’ll be a while before I try to make another triple batch.

To my fellow soapers out there: How big are the batches that you typically make? Have you found it easier to make smaller or larger batches? Do you have any tips for making big batches? Pros and cons? I’d love to have a conversation about this with others who have experience!

Oat-Infused Milk Soap

While perusing other soap making blogs the other night, I found this lovely Oat Milk Recipe for Soap over at Oil & Butter. It’s a simple recipe that calls for soaking oats in water, blending, and straining. I’ve used this same basic process to make almond milk. Simple. Fast. Inexpensive. Great!

Seeing the recipe inspired me to make a batch of Oatmeal, Milk & Honey soap with a new twist. I typically only use milk in my recipe, but did you see my post on Mama’s Milk Soap? I love how it turned out, and the benefits of breast milk are staggering. So I decided to use heavily fatty breast milk and infuse that with rolled oats. I guessed that soaking oats in only milk would create a very thick mess, so I cut the milk with water first. Here’s what I did: two parts distilled water, two parts milk, and one part oats. The oats soaked in the milk water in the refrigerator for a day, then I blended it up and strained it using a tea strainer (since I couldn’t find any cheesecloth). Boy, was that a mess! The milk was stringy and sticky with tiny bits of oats floating around. I strained it again twice, but somehow the tiny oats remained in the mix.

Oat-Milk & Honey Soap

Here’s a first look at the new Oat-Milk & Honey Soap.

I froze the oat-infused milk, then used it to create my lye solution. As with any milk soap, I added the lye very slowly, one tiny bit at a time with the pitcher sitting in an ice bath so as not to overheat and curdle the milk. Because there were still tiny bits of oats in the milk, I was worried about the lye dissolving properly, so I stirred and stirred and stirred. It looked like a mess of disfigured rice pudding! After about half an hour of stirring off and on, I thought it was time to take a deep breath and attempt to make the soap. I had to carefully glop the pudding mess into the oils. To my great surprise, the soap traced at the same rate as usual, didn’t seize, and didn’t cause any other problems either. I poured off a few cups to turn white, then added fragrance to the main batter. A simple in-the-pot swirl resulted in a very beautiful soap. In my excitement, though, I forgot to add the honey! I remembered the bubble wrap for the top and bottom of the mold to make it look like a honey comb, but I forgot the honey! Darn. Despite that, I really love the look of this soap. And I’m still calling it Oat-Milk & Honey Soap because the fragrance has a hint of honey in it.

Oat-Milk & Honey Soap

I just love a good in-the-pot swirl. Every bar is so unique!

I’m honestly thrilled that I could even cut this loaf! I was afraid that the wet oats might leave me with a soppy goo rather than a hard bar, but so far it’s hardened wonderfully. The bits of oatmeal add great texture to it. I’m not usually a fan of exfoliates in soaps, especially large chunks of oats or loofah. But these bits of oats are so tiny that I hardly feel them and don’t mind them at all. I’m hoping that this soap will be even more moisturizing and soothing because the oats were infused directly into the breast milk. As always, time will tell. I got impatient (what soaper can wait for the full cure?) and used an end cut to lather up, and it’s just delicious! It starts with a super bubbly lather, then turns rich and creamy. It leaves my hands feeling like silk!

Oat-Milk & Honey Soap

See the specs of oats in the soap? They look bigger than they feel, and they add great texture without being harsh.

Now that I’ve tried this infusion, I’m excited to delve deeper into the giant world of milk soaps. I’m going to experiment some more with infusions, different kinds of milk, and using multiple milks and creams in the same recipe. I’m seeing more and more blogs and recipes that include a combination of milk, cream, and/or powdered milk in the same soap. And there are so many ways to add it into recipes. The half and half method. The frozen milk method. The hot process add some milk or cream after the cook method. (I’m making up names for methods here, but you get the point, right?) I want to try them all! Next experiment: yogurt soap. I’ll be posting about that as soon as I make it!