Oatmeal Stout Beer Soap

Lately, I’ve really been into making soap using different liquids instead of just plain water. I do love a good water-based bar of soap, but there’s something intriguing about adding in different milks, beer, yogurt, champagne (like this soap), wine, green tea (check this soap out), coffee, or other liquids. The lather often changes (for the better), as well as the colors and texture of the soap. It’s a bit risky to experiment with, but it’s very rewarding and fun. After making a black lager soap about this time last year, I wanted to try something similar but new. This is my latest creation!

20150130-IMG_6419

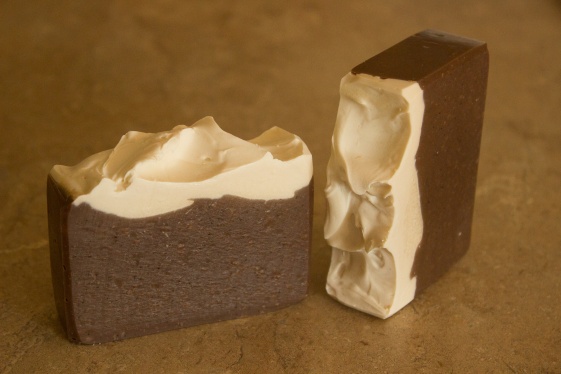
Oatmeal Stout Beer Soap made with beer and finely ground oatmeal

This soap was inspired by an incredible fragrance that I recently purchased from Bramble Berry called Oatmeal Stout. You can’t use that fragrance and NOT use beer as the liquid, right? I opened up a bottle of beer, poured it into my lye pitcher and let it sit open and in the cold for a few days, stirring it every so often, letting it get flat. Then, I made the lye solution by adding in about a tablespoon of lye at a time very slowly. No lye solution volcanoes for me!

I let it cool as I prepped the other ingredients, then carefully poured the beer lye solution into my oils and pulsed the stick blender for about 30 seconds just to emulsify them. After pouring off a few cups of soap to make a frothy white “head” for the soap, I whisked in my fragrance as well as some finely ground oatmeal to the rest of the batter. As expected, the soap got to a thick trace pretty quickly due to the sugars in the beer. The white “froth” on top looked good enough to eat, like a lovely whipped frosting.

IMG_6204

The “head” of Oatmeal Stout Beer Soap in the raw

Within 12 hours of making it, this soap was ready to be cut.

IMG_6220 (2)

Freshly cut, you can see the outside rim of the soap that was most exposed to oxygen already starting to darken.

The base color of the freshly cut soap was a light tan, but I knew that the color would change rapidly due to vanilla content in the fragrance. Just a few days after slicing this soap, it already had a deep brown “stout” appearance.  Pretty cool!

20150130-IMG_6421

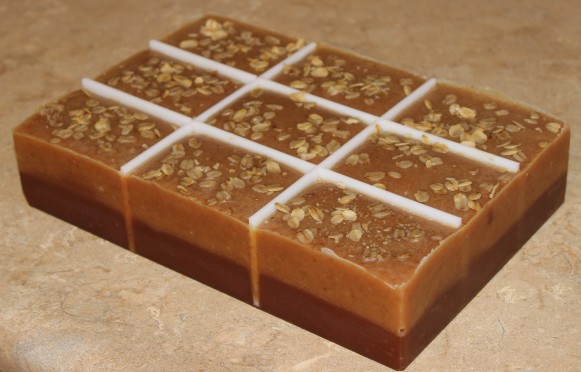
Oatmeal Stout Beer Soap

This scent is very complex with notes of rich vanilla and butterscotch, oranges, milky oatmeal, and nutty almond. I literally want to eat this one! Totally delectable. It’ll be ready in just a few weeks, and I’m excited to use it. This is one beer soap that I truly believe will appeal to both men and women. The lather should be super fluffy and luxurious, and with the addition of ground oatmeal, it should also provide a great moisture protection for the skin. Just the thing we need during these cold winter months!

Psychedelic Green Tea Soap

I’ve written several posts about my adventures in the Soap Crafting Club through Bramble Berry. It’s been super fun and I’ve learned so much. (You can check out this beautiful funnel pour soap, this wild avocado soap, a cool tie-dye soap here, a delectable oatmeal cookie layered soap here, and this gorgeous linear swirl soap if you’d like to see them all!)

Way back at the end of September, I received another kit that I have FINALLY gotten around to making!! I watched the live online soap making presentation by Anne-Marie Faiola (the Soap Queen and author of the fabulous Soap Crafting book), read through the recipe several times, and watched as everyone else made their soaps. It just took me a while to actually make it myself!

20150130-IMG_6424

Psychedelic Green Tea Soap

This soap is appropriately named Psychedelic Green Tea, as it calls for freshly brewed green tea in place of water, has green tea extract as an awesome additive, uses an array of green colorants, and of course uses Green Tea fragrance oil. This is a very interesting and unique soap, and I must say it was a rather difficult one for me to make! (This proved to be a very similar experience to when I made avocado soap.)

I received all of the necessary oils, additives, colorants and fragrance, whipped out my lye, scale, and 9-bar slab mold, then brewed some tea. I let the tea cool in my cold garage for most of the day, then I made the lye solution as directed, adding the lye very slowly to the green tea. It turned a deep brown color as expected. Here’s a look at the ingredients and lye solution just before I got started making the soap.

IMG_6180

Melted oils (that I received pre-measured 😀 ), deep brown green tea lye solution, fragrance, green tea extract, colorants and oil to prep them in, and my book laid out for reference

As the lye and oils cooled, I prepped the colorants, got my soaping station all ready, and reread the recipe to be sure I remembered the steps. I added 96 degree lye solution to 108 degree oils, and to my great shock, it was at a medium trace within about 30 seconds of pulsing my stick blender. I did NOT expect that! Especially since I still had fragrance, colors, and additive to add! I was hoping for a nice fluid soap (as pictured in the book) so I could make the lovely intricate swirl design called for. Instead, I ended up with pudding.

IMG_6184 (2)

After splitting off the soap and adding in everything, you can clearly see how thick the soap is.

Despite my pudding soap, I kept whisking and stirring to try to keep it workable. I used spoons and spatulas to plop soap into the mold in s-shapes and stripes, and I pounded to my heart’s content, hoping for no major air pockets.

IMG_6186 (2)

Wow. That’s some thick soap. It’s so much easier to work with when it’s fluid!

I still swirled using the pattern shown in the book. Rather than having a wispy (and flat) soap, I ended up with this lovely textured top! (I’m going for that lemonade from lemons attitude.)

IMG_6188

I was either brave or stupid, but I swirled it as shown in the book!

IMG_6190

I had to work hard to push the dividers into the soap, and I see a few air pockets on top. Fingers crossed that it’s only on top and not through the entire soap!

Though my soap looks very different than the examples, I think it’s still pretty psychedelic! I had to let it sit in the mold for a full week as it was super wet. Even after a week, I had to carefully release the silicone liner and still peeled off a bit of soap. I let it sit in the open air for 2 more days before I removed the dividers.

20150130-IMG_6425

Psychedelic Green Tea Soap. It’s interesting to see the drag marks down every side of this one, and both the top and bottom of the bar have cool designs.

This is certainly an interesting soap (both to make and to look at). It’s a fresh, invigorating scent, and it should be extra nourishing. I’m going to let this one cure for at least 6 more weeks, maybe longer. And I may even cut some of these giant cakes in half, some horizontal cuts and some vertical cuts, to peak at the swirl pattern inside them!

20150130-IMG_6426

Did you notice? No major air pockets in the soap!!! I’m thrilled! 😀

I’ve really had a blast making all the soaps in the 2 sessions of Soap Crafting Club that I joined. Every experience has helped me to learn, for which I am very grateful. I hopped onto the Bramble Berry website this morning and see that the current Winter Crafting Club session is full, but I’m seriously contemplating joining in the Spring Club that starts in May, the one that covers the 3 most difficult techniques in the book. Makes me a bit nervous, but I think I can handle it now that I’ve had so much practice with this club (and with the Soap Challenge Club). It’s so much fun to interact with other soapers and to have the personalized touches and online support that Bramble Berry offers.

Thanks for stopping by! And just FYI, I’ve scheduled a few posts for these next few weeks since (I’m hoping) I’ll be very busy. I’ll let you know when messy baby #6 arrives!

August Soap Crafting Club: Linear Swirl with Oxides

It’s the second month of Bramble Berry’s summer Soap Crafting Club, and boy, was this soap fun!!! I know. I say that pretty much every time I make soap. But it was seriously FUN this month! (If you haven’t picked up a copy of Anne-Marie Faiola’s book Soap Crafting, I highly, highly recommend it.)

IMG_3848

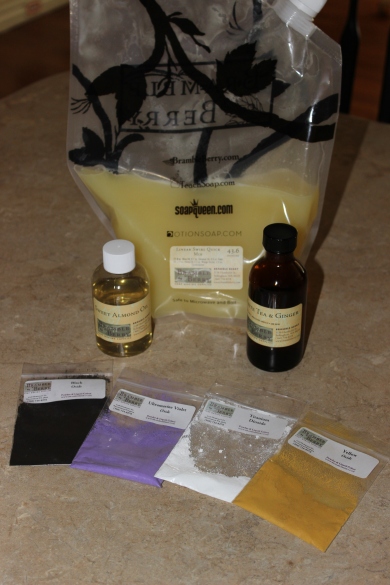
August kit contents: premixed base oils, sweet almond oil, White Tea & Ginger fragrance oil, and 4 oxide colors. We’ll be using the same 9-bar birchwood mold and more lye from the July shipment.

Once again, all of the extra information and videos available to the club members online was invaluable. I watched the video a few times and read through posts from other members who had already made the soap. Feeling pretty comfortable with it, I dove right in.

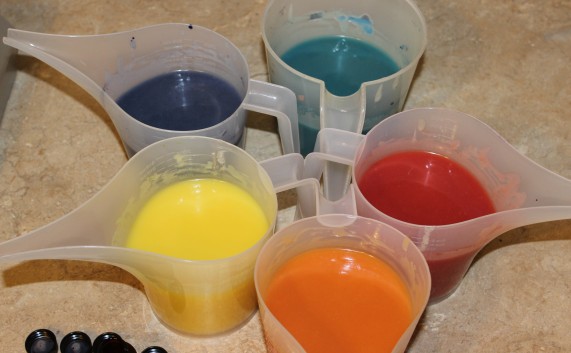
I began by mixing together the lye solution and heating the oils. Next, I mixed each of the oxides into the sweet almond oil and prepped my work space. When my lye and oils were at about 110 degrees, I blended to emulsify them then whisked in White Tea & Ginger fragrance oil. I used my handy dandy long pour-spout measuring cups to divide out the soap into 4 parts and mix in the colors as outlined in the recipe. In my haste to get the soap poured into the mold carefully, I forgot to have my hubby take pictures of the process! But rest assured, I followed the instructions closely and made lots of long s-curves, alternating my 4 colors in a side-by-side pattern. As I neared the last few pours, I tried to make sure that each colored stripe was visible and distinct so that the final swirling would reveal all of those beautiful colors.

IMG_3849 (2)

The raw soap before swirling

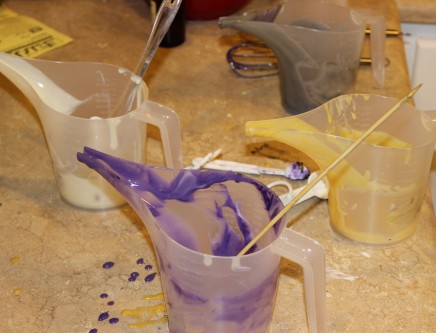
And I did get a picture of the pouring aftermath!

IMG_3870 (2)

Not as messy as I’ve been in the past, but certainly not super clean!

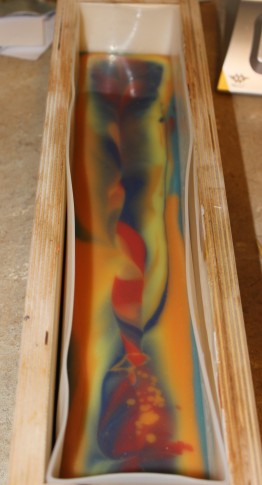
This technique called for the linear swirl, which I’ve done before and referred to as the Taiwan Swirl. (The top of the Tie-Dye soap from this club was also a linear swirl on top.) The final result of this technique is absolutely stunning every single time. The difference with this particular soap is the multiple pours of each color throughout the entire body of the soap. There will be tons and tons of visual interest for the life of this soap, each use revealing a new pattern.

I began by inserting a skewer to the bottom of the mold and dragging it back and forth in a vertical motion across the horizontal stripes.

IMG_3850 (2)

The first swirls are already revealing lovely feathering.

Next, I drug across the new vertical stripes in a horizontal motion.

IMG_3863 (2)

Now it’s even more beautiful!

IMG_3867 (3)

All the swirling complete and dividers in place. It’ll be interesting to see the drag marks down the sides of each bar created by the dividers.

Isn’t this just GORGEOUS!?!? It looks just like the versions in the book and online that I’ve seen. I’m amazed that I could recreate it!

After a few days, the soap slid right out of the silicone liner. I flipped it over, and look!

IMG_4000 (2)

Even the bottom of this soap has tons of visual interest!

I had to wrestle it out of the dividers more than last time, but it still came out cleanly. Every bar is beautiful.

IMG_4124 (2)

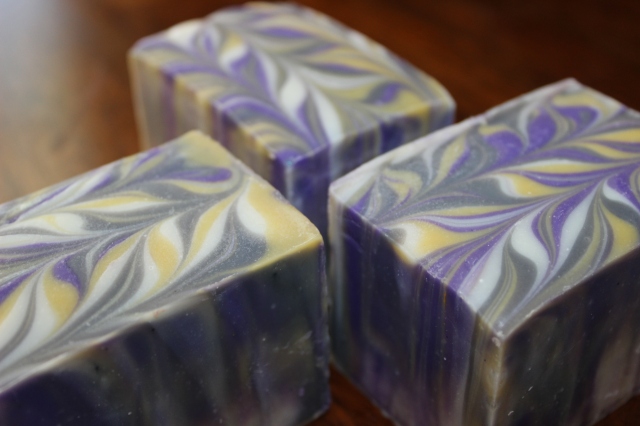
After a week of curing, the colors have muted a bit, especially the gray. But the fine feathering is still quite visible. (Please forgive the messy edges and soda ash. I’ll clean these up a bit after they’ve had proper time to harden.)

The White Tea & Ginger fragrance is bright and clean, and it was extremely workable. This will be a fun and refreshing bar of soap to use.

IMG_4121 (2)

The drag marks left from the dividers is a cool effect around each side!

IMG_4130

Another view of the drag marks and feathery details of this White Tea & Ginger Linear Swirl Soap.

These experiences along with the monthly Great Cakes Soapworks Soap Challenge Club have been absolutely invaluable to me as a soap maker. With each new batch and new technique, I learn more and more about workable textures and how temperatures, additives and colors affect soap.  Oh, how far I’ve come since those first few batches!

Only one more month left in the Summer Soap Crafting Club. Drat. I’m wishing this would just keep going and going! But I’m looking forward, as usual, to what will arrive in a few weeks on my doorstep!

July Soap Crafting Club: Oatmeal Layers

After my first awesome experiences in the Bramble Berry Winter Soap Crafting Club, you can only imagine my thrill at receiving a Summer club subscription for Mother’s Day! You can check out my first club soaps here, here and here. They all turned out pretty great, and I couldn’t wait for my next kit shipment to arrive in July.

Here’s what came in my first summer kit:

IMG_3805

9-bar birchwood mold with silicone liner, divider insert, and lid, premixed base oils, Oatmeal Cookie fragrance oil, Almond fragrance oil, and oat extract. (Also included was a bottle of lye and a shiny new scale for measuring it out to make each lye solution.)

All I had to supply was the mixing equipment, the Soap Crafting book, and some water and oatmeal! Easy peasy.

O Soap Crafting Club, how do I love thee? Let me count the ways.

  1. Base oils come pre-measured and pre-mixed. Joyful joyful.
  2. Silicone-lined mold included. Need I say more?
  3. Awesome instructions in the book and online, plus videos, and a live demo session. Whoa!
  4. Online community in which Anne-Marie and Bramble Berry staff interact frequently. Soapers Unite!
  5. A chance to learn new techniques and simply make awesome soap.
  6. For three straight months, it’s so fun to receive a new shipment of materials for each soap!
  7. Different soap recipes with new oils and/or butters, new fragrances, and new colorants and/or additives to try. Such a great way to try out ingredients using someone else’s published tried-and-true recipes and techniques.

I’m certain there are more reasons, but I digress. On with the soaping.

After reading all of my materials and prepping my space, I began making my soap. First, I made my lye solution and heated up my oils. While those were cooling, I blended up some oatmeal to make oat flour. I also added a bit of goat’s milk to the oils for some extra skin-nourishing goodness. When my lye water and oils were both at about 120 degrees, I mixed them, added the oat extract and divided off half the soap. To one half, I added whole oats and oatmeal cookie fragrance and whisked it all together, then I poured it into the mold. Next, I added the almond fragrance oil and oat flour to the other half of the soap and blended. I poured this mixture over my spatula and into the mold, creating a new layer of soap on top of the first.

IMG_3808 (2)

Pouring the top layer

Finally, I inserted the dividers into the soap and sprinkled a few oats over each bar. I spritzed with alcohol, put the lid on, and popped the mold into a barely warm oven.

IMG_3827

Raw soap with oats on top

To my surprise, after just a day, the soap seemed hard enough to attempt to unmold. Yay! It slipped right out of the silicone liner, and I had no trouble at all pushing each bar out of the dividers. I was also surprised to find that the bottom layer had already begun turning brown thanks to the vanilla content in the fragrance oil.

IMG_3831 (2)

Just one day after making it, here’s the soap fresh out of the mold. The layers are pretty darn straight and even. Yippee!

It was fun to see how the outside was brown, but the inside (the part not yet exposed to the air) was still all the same color.

IMG_3839 (2)

Pretty cool, right?!

It’s fun to watch the bars cure. Over time, the vanilla on bottom has caused the soap to turn a very deep shade of brown. After just 2 weeks of curing, here’s another look.

IMG_3992 (2)

The layers are quite distinct now, and you can see the bits of oatmeal suspended throughout the soap. It has developed a bit of soda ash all around, but that’s an easy enough fix (or it’ll be gone after just one use anyway). 😉

These bars are really simple and beautiful. And they smell AMAZING! Love the fragrance blend. Plus, they’ll be super skin-nourishing as well as exfoliating. This was a fun, relatively simple and fast soap to create with great results.

I can’t wait to see what arrives in the August kit!

Soap Crafting Club Adventure #3: Tie-Dye Soap

I’ve finally finished my Soap Crafting Club Winter Session! (On an 80-degree sunny day, just as school’s getting out…) 🙂 This club has been so much fun! You can check out my first club Funnel Pour adventure here and my Avocado soap adventure here.

This is the kit that arrived for the third month’s Tie-Dye soap:

IMG_2975

Premixed lye solution, premixed oils, Black Cherry Fragrance Oil, and 5 different diluted LabColors.

I was really anxious to make this soap when my kit arrived back in March, but it’s a good thing that I didn’t make it right away! As other members of the club soon found out, there was a manufacturing problem with the Black Cherry fragrance oil that made the soaps seize! OH NO! The Bramble Berry staff let us all know right away not to use the fragrance, and Anne-Marie gave a great tutorial on Hot Process Hero rebatching so those who had already tried the technique could at least salvage their soaps. Then they quickly got to work to correct the problem with the fragrance oil. I received a generous stipend to order a new fragrance of my choice, but I was a bit slow at ordering! When I finally got around to it, I decided on Yuzu for this project as it’s known to keep soap very workable.

Once again, I studied my Soap Crafting book and watched the club tutorial videos as well as a live demonstration that Anne-Marie gave online. The resources have all been so handy. And the kit makes everything so easy, too! It’s amazing how little time it actually takes to make soap when the oils have already been measured out for you, the lye solution has been made, and you don’t have to line your mold! Can I get a soap fairy who would do those things for me every time?

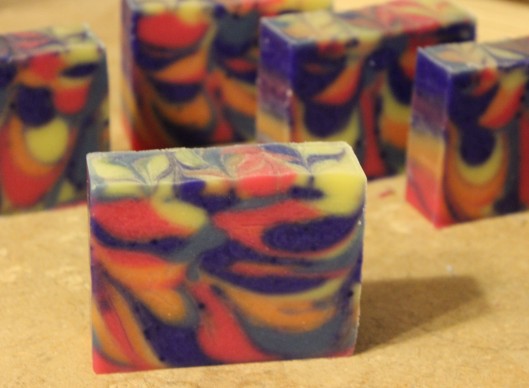
After barely emulsifying my oils and lye, I divided up the soap into my *new* extra-long pour spout measuring cups. Then I added in the premeasured LabColors as well as the fragrance oil, stick blended just a touch more, and began pouring.

IMG_2977 (2)

Awesome colors, right?!

These new cups really make it easier to pour precisely. I started by alternating light and dark colors in one straight line pour down the length of the mold, then I began pouring in a U shape. The soap displacement was really cool to watch!

IMG_2979 (2)

Tie-dye soap half-poured is already living up to its name!

IMG_2981 (2)

Last pour complete!

IMG_2985

Final swirls all done!

After pouring all the soap, I swirled the top in a tight Taiwan swirl pattern, sprayed the soap with alcohol, then put it in a slightly warm oven to ensure full gel. The colors are awesomely bright! I watched the soap closely and took it out of the oven once full gel was reached. I didn’t want it to bubble up and out of the mold!

And the reveal…

IMG_3009

Whoa! Lots of interesting swirls and drops!

Isn’t it so bright and fun!? Every bar is totally different, and the Yuzu fragrance is just as energizing as the colors. Totally psychedelic, dude! (I couldn’t help it. This soap screams out so many cheesy phrases.)

IMG_2997 (2)

Freshly sliced Tie-Dye soap

It does have some royal blue spots throughout. I noticed that the royal blue LabColor kind of plopped out of the bottle. Oops. I should have shaken it up well before I put it into the soap, but it was too late at that point! I just stick blended it more than the other colors, but it obviously still didn’t get fully incorporated. Over time, I anticipate that the colors will blend together and the dots will dissipate a bit due to the nature of LabColors. Either way, it’s no matter to me. I like the dots! Like dye splatters on a tie-dye shirt. 🙂

I’m so glad to have participated in the Winter Session of Soap Crafting Club! And did I mention? For Mother’s Day, this lucky mama received a membership to the Summer Session from my five messy babies and their daddy!!! I can’t wait to get my soap on! Though I won’t receive my next kit until July, I’ve already read through the recipes for my upcoming session. I’ll be getting a new 9-bar slab mold with dividers, and the soaps look like they’ll be fun and challenging to make. I can’t wait!

Soap Crafting Club Adventure #2: Avocado Soap

In my last post, I explained how my awesome hubby got me a membership in the winter session of the Soap Crafting Club for my birthday. It’s been so much fun so far! And I’m still obsessed with that Blackberry Sage funnel pour soap made in my first adventure. I. LOVE. THAT. SCENT!

Whereas my first soap came off without a hitch, my second adventure was an entirely different experience!

February’s soap was one that I was really looking forward to creating: an avocado moisturizing bar. Here’s what came in my kit:

IMG_1498

Premixed oils, lye solution, Wasabi fragrance oil, Green Chrome oxide, Yellow oxide, and a bit of sunflower oil for mixing the colorants.

Looks simple enough based on the supplies in the kit, right? Wrong. Keep reading. You’ll see…

Just as before, I armed myself with information galore, watched the videos a few times, and read and reread the recipe in the book. On soaping day, I set up my Soap Crafting book and computer beside my soaping station, pureed my avocado with a bit of distilled water, and prepped my colorants.

IMG_1500

I especially love the darkest green chrome oxide color. So pretty.

As it was still snowing outside, I had to heat up my cold oils to get them nice and fluid. Since my lye solution was also pretty cold, I decided to add it to the 126 degree oils, thinking it would even out in the end. It did bring the overall temp down, but I didn’t realize how big of a deal this was until I really got into making the soap. Holy moly, did it trace fast!!!

IMG_1499

Adding avocado puree to the soap batter.

I’m not sure if it was the combination of oils and avocado, the heat, or the Wasabi fragrance oil (which is very floral), but this soap sure did set up quickly.

By the time I added the colors, the soap was nearly unworkable. I had to squash the bottom dark green layer of soap into the mold, then I pushed the next lighter green layer in, and finally I scooped the yellow soap on top. Yes, I said scooped. The soap was already soap! I tried desperately to mix it with my whisk, then with my spatula, but it wasn’t budging.

IMG_1503

See how thick it was?

I had to peel that yellow soap out of the mixing bowl like I would scoop ice cream, and then I used my gloved fingers to push it off the spoon and mound it up. In fact, I wished it would melt like ice cream. It would have been easier to work with! There was most certainly no making this pretty with swirls on top. I can’t believe I was actually able to salvage it at all!

IMG_1501

And here it is, smashed into the mold.

Since I knew this soap was so hot already and risked having a partial gel, I didn’t even attempt to put it in the freezer like Anne-Marie suggests in her book. I’m an all-or-nothing kind of girl, so I went for FULL gel! I put the soap in my oven, but I didn’t turn the oven on; I just let it hang out in there, doing it’s thing.

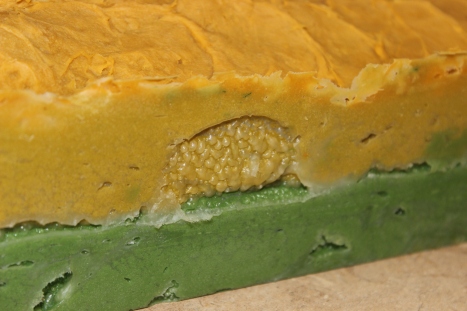
About 12 hours later, it was already hardened enough to unmold and cut! It was really interesting peeling the silicone mold away from the sides of this one. I expected to find lots of air pockets, but I found even more than that! Check it out!

IMG_1526

What do you call that?

IMG_1529 (2)

I found a few of those funky pockets down each side of the loaf, along with some air pockets (though fewer than I expected!).

Cutting this soap was fascinating! Once opened up, I found glycerin rivers everywhere. Apparently the soap got hot enough for the glycerin to begin separating, and it made some really cool effects.

IMG_1530 (2)

See the rivers all over? Pretty cool. And I can’t believe the layers turned out so even after all that smashing and pushing!

Just a few weeks later, Anne-Marie wrote up this post on her blog about this very subject! The heat of the soap and the oxide colorants were the culprits.

IMG_1548

Here’s a shot of the soap in natural lighting, showing the transparency of the glycerin rivers.

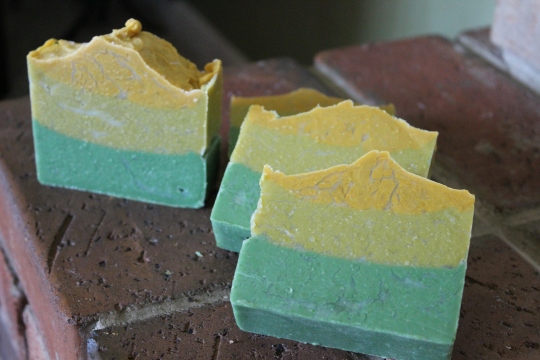
Though this was completely unintentional, I’m glad these rivers happened! This soap is so unique and pretty.

IMG_1537

I know this is far from perfect, but I just love the interesting details, from the weird alien brain bubbles on the sides to the rivers running everywhere.

This is a really fascinating soap. I’d like to try making it again to see if I can replicate the original soap design, the one without gel phase or glycerin rivers! I’ll definitely soap at lower temperatures next time! And I’m also anxious to try my hand at using other real foods in soaps.

Want to see my final adventure from Winter Session of Soap Crafting Club? It’s here!

Thanks for stopping by!

Soap Crafting Club Adventure #1: Funnel Pour

Back in October, my awesome husband gave me the birthday gift of membership to the winter session of Bramble Berry’s Soap Crafting Club! What an incredible gift, right?! My extreme excitement made it terribly painful to wait for that first delivery of soaping supplies at the end of January. But it was totally worth the wait! I eagerly read through Anne-Marie’s new book, Soap Crafting, paying special attention to the soaps that I knew I would soon be creating. And I must say, reading the book made me even more anxious to receive my supplies!!!

Arriving right on schedule, my first delivery included Bramble Berry’s 5-pound wood mold, complete with sliding bottom and silicone liner, plus all of the supplies needed to complete the first month’s soap: a luscious and beautiful Blackberry Sage Funnel Pour Soap! Here’s what my first shipment included:

IMG_1341

The 5-lb wood mold and liner, a funnel, a bag of premixed oils, a bottle of premixed lye solution, and Blackberry Sage fragrance oil

IMG_1339

Some sweet almond oil for mixing colorants, and 6 colors: Easter Purple, Sage Mist, and Fuschia diluted LabColors, as well as some titanium dioxide, lustre black mica, and brown oxide

After reading the information and watching the videos provided online, I got busy making my first true funnel pour soap. As I prepped my workspace, I set up my computer (just in case I needed to watch the video again) and opened my book to the correct page. I felt so studious! 🙂 And mold prep was so easy! I never knew the joy of silicone liners until now! I have silicone molds, but I had never lined a wooden mold with silicone. NO freezer paper manipulations! How wonderful!!! I made sure to get my mold in place, complete with upside-down bottom-out cottage cheese container and funnel on top.

IMG_1342 (2)

A fully prepped work space. Aaahhh. Such a beautiful thing.

First, I prepped the colors as indicated. Then, I carefully mixed the premeasured lye solution into warmed oils (to which I added a bit of goat milk powder), and blended to a very light emulsification. I divided off my soap into 5 separate containers and got busy whisking in colors and fragrance.

And then began the pouring! The soap was very fluid at first, and I made sure to whisk it after every 3 or 4 rounds of pouring to maintain the fluidity.

IMG_1347

The layers were spreading out beautifully!

Near the end, it was beginning to set up, but it was still pourable. The outermost layers (those first poured) were hardening up and not sliding out as easily as I’d anticipated, so I had to jiggle the mold frequently as I neared the end of pouring. It created a slight texture on the top of the soap, which adds even more interest. And this soap completely filled my mold! Look out! I realized that my soap was beginning to overflow from the middle just in time! I almost had soap waterfalls down both sides of my mold!

IMG_1348

See where the light touches the ridges? And see how full that mold is?!

I must say that making the soap was really quite a cinch! I carefully followed all of the instructions and tips, and I took my time to assess each aspect of the soap (while still working quickly to make sure my soap didn’t set up too fast!).  All of my preparation and attention to detail paid off, and I had a very happy soaping session indeed. Utter satisfaction is planning and prepping, then executing to actually achieve the expected end result! That most certainly doesn’t happen often, but it happened on this soapy day! 🙂

IMG_1382

The first cut!

IMG_1506

And the layers revealed!

After cutting this soap, I did discover small white dots inside, which means that I must have whisked in some air bubbles along the way. I also found some large purple spots, which means I must not have gotten  my Easter Purple LabColor mixed in thoroughly, despite all of my whisking! I like the purple dots; I could most certainly do without the air bubbles. But alas, such is a soaping life. These few small things don’t take away from my super-fun soaping session!! It was a blast making this soap!

IMG_1386 (2)

These are cuts from near the center of the loaf. Look how cool! How did it do that? I love the layers! This is a good shot of the air bubbles and random purple spots, too.

This soap has been curing for a couple of months now, and the layers are blending together a bit, the lines softening thanks to the LabColors. The photos show a deeper brown/tan hue than the soap appears to be in real life. It looks more like pink in person. And when it’s wet, I don’t notice the air bubbles at all!

IMG_2432 (2)

Looks like a perfect bar now! (Because it’s the one I’m currently using in the shower!)

Blackberry Sage is by far my newest obsession in fragrance. I cannot get enough of this scent! I bathe with it, then I want to spray my rooms with it, wash my clothes in it, and slather it all over myself and my children so I can sneak sniffs all day long! Which means I must order some more Blackberry Sage fragrance so I can make room spray, laundry soap, lotion, and of course, MORE SOAP! It really is a wonderful spring and summer scent, and I don’t think I’ll ever get tired of smelling it. Do you have a favorite scent like that?

I’ve been thoroughly impressed with my membership to this fun club. I have access to an online classroom where the BB team posts instructions and videos on how to make the soap. There’s a whole community of soapers involved, from very experienced to brand-new saponifiers, who all get to post pictures, ask questions, and share experiences. There is so much value in interacting with one another, and it’s so cool to see how the same recipe turns out differently every single time. Climate and temperature and technique make every batch of soap unique and special. It’s been a lovely reminder that soapmaking truly is an artform, which Anne-Marie’s book so vividly displays.

Check out this post and this one to see my other Winter Session Soap Crafting Club adventures!

Until next time, I wish for you wonderful days full of favorite scents and suds!