Great Gifts: Cute Head Gear!

Gift giving season is upon us, and I absolutely love to give (and get) handcrafted items! I’ve been busy busy busy lately working up lots of cute hats, headbands, and bows for my kids, friends, and customers. Along with making about a hundred pounds of soap, this is what I’ve been up to lately!

Here’s a stash of crochet hats that I worked up for a friend’s baby girl.

DSC03663 (2)

Crochet hat stash

The two on the left are butterfly stitch beanies. I found a few good tutorials for that stitch on YouTube, modified for sizing, then added my own different brims for a cute twist on the styles. The green and white hats on the right are made with puff stitches, and they are so cozy. The middle darker purple hat is a shell stitch body with simple double crochet crown. It looks lacy when on, and I love the scalloped edges. 

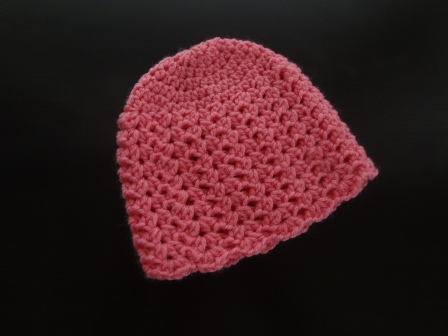
Here’s another shell hat I made in hot pink.

DSC03851

Shell Crochet Hat

I purposefully didn’t embellish these hats with attached crochet flowers because I want them to be interchangeable. I previously sent my friend several flowers in lots of colors, styles, and sizes to use as hair clips. Those same hair clips can do double duty now! Clip flowers or bows to hats to match every outfit. Then when you get where you’re going, the hat comes off and the clip goes into hair! It’s so much fun to have interchangeable flowers and hats, and they can all be used on headbands, too! The possibilities are endless.

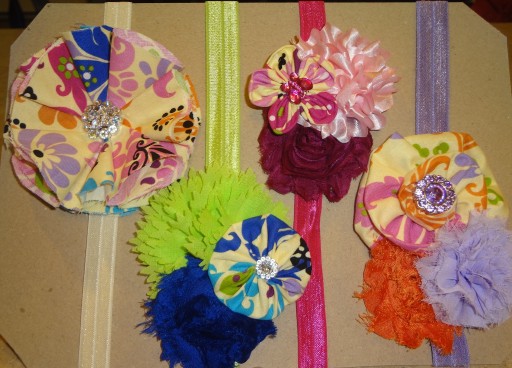
Speaking of headbands… Here are a few custom orders that I recently made. They turned out so pretty that I wanted to share them with you! 🙂

IMG_1186 (2)

Custom Wedding Headbands

I made these headbands to match beautiful wedding rehearsal and flower girl dresses for a one-year-old cutie, but I think these could be worn by ladies of any age! They’re done with satin rolled roses, big and small, as well as satin puff flowers, some chiffon poofs and tulle flowers, and bling of course! All are attached to soft sparkle elastic.

This next custom headband set was made with a customer’s special fabric scraps, all the same print but in different colors.

DSC03843 (2)

Custom Fabric Flower Headband Set

First, I made a different flower out of each fabric and then paired it with matching bling, solid flowers and elastic. Then I made one large flower (on the left) out of all three fabrics combined. I left it with raw edges so it’ll turn a bit “shabby” over time as well. It’s hard to see in the picture, but that big flower has fluffly, springy 3-D petals all around (it’s not flat like it appears).  So cute! These headbands will be awesome with everyday outfits, and won’t they be so cute in pictures?

And since there are so many cute photo opportunities this time of year, check out this festive prop hat! A friend asked me to make an elf hat for her new grandson, and it was so adorable that I made one for my youngest babe, too.

DSC03849

Elf Hat

This one is a simple half double crochet stitch for the entire hat. I’m planning to make 4 more for my other kiddoes using the same colors but in various row formations and styles. I‘ll be sure to share a photo of my five messies wearing their hats IF I can get them all to keep the hats on long enough to get a photo!

If you happen to be interested in giving any gifts like these and would like more info, please feel free to contact me! I’d be happy to give you tips and info if you want to do it yourself, and I’m also happy to make custom orders for you. Let’s get creative!

Crochet Pumpkin Hat

With fall securely here, I’m loving all things pumpkin! About a month ago, I made my first batch of pumpkin muffins this season, and I haven’t been able to get pumpkins off my mind since.

I wanted to make something cute for the baby to wear on our annual visit to the pumpkin patch. A Pinterest search led me to this free crochet pumpkin hat pattern by Cathy Kurtz.

Crochet Pumpkin Harvest Hat

Crochet Pumpkin Harvest Hat

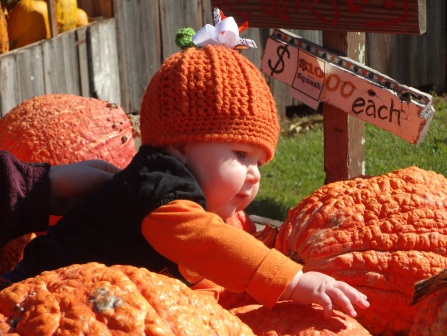
I used a size G hook with Red Heart Super Saver yarn as suggested. It was a pretty quick pattern to work up, not too difficult, and fits my nearly 9-month-old perfectly. Take a look!

DSC03475

I love the hat, but I love the chubby cheeks even more!

I especially like the front post double crochet stitches that create the ribs, making this hat really look like a pumpkin. And that stem! The curly vine and leaf on top are just too cute. In these pictures, they’re a bit obscured by the bow that I clipped on top to make sure everyone knew this little pumpkin is a girl!

IMG_1104

My little pumpkin sitting in the little pumpkins!

This is by far the cutest pumpkin hat pattern I’ve found! We’ve gotten lots of compliments on this one.

DSC03454

Can you tell I’m a bit enamored with this sweet baby?!?!

If you like this hat, you might like the other free patterns on my Pinterest board. Happy harvest hookin’!

Crochet Ruffle Socks and Booties

Colder weather has me wanting to stitch up lots of cuteness for the baby! She’ll only be able to wear adorable crochet footwear for this season before she starts walking and needs actual shoes, so I have to make the most of it. They really do grow up so fast!

Here’s a look at my newest projects fresh off the hook.

Crochet Ruffle Socks

Crochet Ruffle Socks

I used a pattern called Frilly Feet by Christy McMahon from the Spring 2012 issue of Crochet Today! magazine. You can see their picture here, as well as purchase that May/June 09 issue of the magazine where the pattern originally appeared. If you know the basics of making socks, you simply crochet every other row of the leg using the back loops only. This will leave you with a front loop in which to crochet shells, creating cute ruffles.

Crochet Ruffle Socks in action

Crochet Ruffle Socks in action!

I used a Size E hook with Premier Yarns’ Deborah Norville Collection, Serenity sock weight yarn in the color Pink Sugar. I just love these socks, and they really weren’t too difficult to make.

Crochet Ruffle Socks on my cutie!

The socks just add to the cuteness!

After making the socks, I wanted more cute footwear! I was cruising through Pinterest and found this adorable free pattern for cuffed booties.

Crochet Cuffed Baby Booties

Crochet Cuffed Baby Booties

Sarah’s Repeat Crafter Me blog is super cute, and her instructions include a video for the first several rounds of the bootie. I even learned a new way to decrease stitches! She also has an example of boyish cuffed booties for those of you with boys. I used a Size G hook and Red Heart with Love yarn. The booties were really fast to work up, and I just love them!

Crochet Cuffed Baby Booties

No cute photo of the baby wearing these (yet, anyway). She was entirely too wiggly and trying to chew on the booties during our photo shoot! They are super cute on her, though! At 8 months old, they fit her well and should have enough room for her to grow into them for the next few months.

Both of these projects would make great gifts for the new babies in your life! I’ve pinned a few other really cute free patterns on my Pinterest board if you’d like some more ideas! 🙂 Happy hookin’!

Hooked on Crochet: Mug Cozy and Boot Cuffs

My mom taught me the basics of crochet when I was pretty young, and this past year I’ve picked it back up. I’m totally hooked on crochet! (Yes, silly cutesy pun intended!) Just like making soap, I love to crochet things that are both useful and pretty. It’s an awesome outlet for creativity, and I find it completely relaxing to sit with yarn in one hand and hook in the other. I’ve been meaning to post some of my fun creations of late, so here we go!

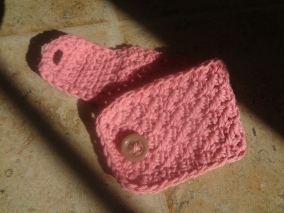
Our recent change in weather has gotten me really in the mood to make some warm and cuddly things. I started out with this cute little mug cozy. Find the tutorial and free pattern here. I used cotton yarn and it only took about half an hour to make. This really simple stitch turned into a beautiful fabric.

Mug Cozy

I love the lacy look of the fabric on this mug cozy.

Mug Cozy

It fits perfectly around my favorite mug and matches the etched rose detailing.

I’ve found several cute free patterns for cozies, giving me lots of great gift ideas. Look out friends and family! I’m thinking adorable cozies snuggled around a cute mug with a fav bag of coffee, tin of tea, or gift card to a local caffeine-laden hangout. (Along with some handmade soap, of course! 😉 )

My next project was inspired by a gorgeous outdoor wedding that I went to this weekend. We dressed down for this casual farmer-country weddin’. I saw lots of jeans with tall boots that could have used these little cuffs to really make them pop!

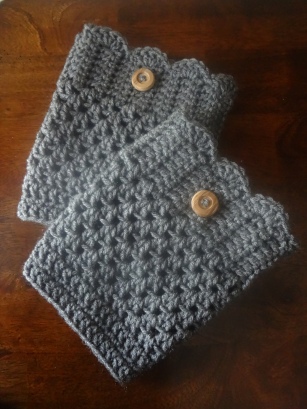
Boot Cuffs

Cute crochet boot cuffs

I found the tutorial for these boot cuffs here, and the pictures on that link are quite helpful. The cuffs are super cute and pretty simple to make with only chain, single crochet, and double crochet stitches, but I had a bit of trouble following the pattern at times. I noticed in the comments that several other people had questions at the same places I did, so I’m going to try to answer those questions and show a few more pictures.

Here’s what you’ll need:

  • Your favorite worsted-weight medium yarn (I used some Super Saver that I had on hand)
  • Size H crochet hook
  • A couple of buttons if you’d like, as well as a needle to sew them to the cuffs

Here’s how to do it:

  1. Chain (ch) 8. Turn.
  2. Single crochet (sc) in the second stitch from your hook and in each remaining stitch to the end of the row. Ch 2, turn.
  3. Double crochet (dc) in the third stitch from your hook and in each remaining stitch to the end of the row. Ch 1, turn.
  4. Sc in the second stitch from your hook and in each remaining stitch to the end of the row. Ch 2, turn.
  5. Repeat Step 3 and Step 4 for several rows. Use your leg as your measuring guide. This long fabric will wrap around your leg, probably at the calf or just below the knee (wherever the tops of your boots hit). Remember that the yarn will stretch, so make it a bit small. Mine ended up being a total of 30 rows. You’ll want to stop at a double crochet row (Step 3) in order for the seam to be less noticeable.
  6. Once you reach your desired length, it’s time to connect the beginning row to the end, forming the actual cuff. I slip stitched my work so that the front of the double crochet stitches would be the front of my cuff. It’s really personal preference as to which side you choose to call the front. To connect the ends, put the front to the inside of the circle and slip stitch all the way down the row. You’ll put your hook through the 2 loops that touch each other when the fabric is put together. When you get to the end, do not cut your yarn. Flip your cuff inside out, so the front is now facing outward.
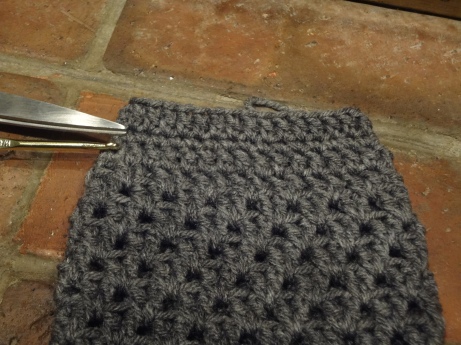
  7. Here’s where the confusion set in for me. You’ll be working in the round for the remainder of the boot cuff. That means you’ll have to turn your cuff and work on what used to be the side of your fabric. It’s now the top of the circle. Find the first double crocheted row that is to the left of your hook. Work two double crochet around the first double crochet loop of that row. Take a look at the photo below. Now work 2 dc in each top double crochet loop all the way around the circle. Slip stitch the last dc to the first when you get all the way around the circle. (If you made 30 rows like I did, you’ll have a total of 15 pairs of dc in the round.)

    Making the Boot Cuff

    The scissors are pointing to the single crochet row (they look like ridges), and the hook is inserted into the double crochet loop. See the small scalloped edges all along the bottom? Those are the loops you’ll use to stitch 2 dc in the round (as already shown on the top of my work in this picture) and to complete the large scallops in the final step.

  8. Continue working 2 dc in the space created between each set of 2 dc stitches in the round below. Slip stitch at the end of each round. Repeat this for 6 more rounds, giving you a total of 8 rounds.
  9. Still working in the round, chain 2, dc in the third stitch from your hook. Dc in each stitch all the way around. Slip stitch to the top of the chain 2 space when you get to the end of the round.
  10. Ch 1. Sc in second stitch from hook and then in each stitch to the end of the round. Slip stitch to the first sc.
  11. Repeat Step 9. Tie off your yarn. You’ve just finished the bottom of your cuff!

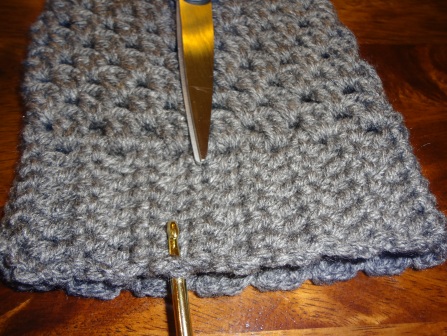
    Bottom of the boot cuff

    Here’s the bottom of the boot cuff. The hook is pointing to the double crochet row (Step 9), the scissors point to the single crochet row (Step 10), and above them is the final double crochet row (Step 11).

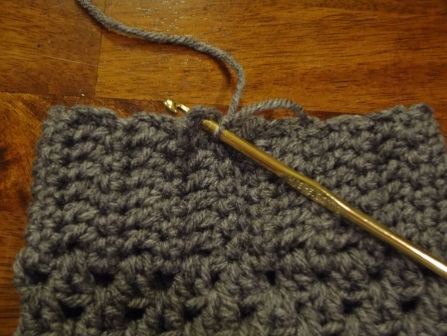
  12. To finish the cuff, you’ll flip it over and create a lovely scalloped edge on top. Remember those dc spaces we used on the bottom side to start the round? You’ll be using the dc rows again for this edge. Attach yarn to loop using a single crochet. In the next dc loop, work 5 dc. Slip stitch to the next dc loop. Work 5 dc in the next dc loop. Slip stitch to the next dc loop. Repeat 5 dc in one loop, slip stitch to next loop until the end of the round. Slip stitch at the end of the round and tie off your yarn. Weave in your ends, then attach buttons if you’d like. And there you have it! Of course, you’ll have to make another one to have a matching pair! The second cuff is going to be quick and easy now that you’ve got some experience. If you have any questions, please ask and I’ll try to explain!

    Finishing the boot cuff

    Attaching the yarn on top of the cuff using a single crochet stitch.

Now pull out your tall boots and donn your lovely new cuffs! These are so cute! I think I’ll be making several pairs in different colors. It’s a great project to use up scraps of yarn, and it’s easy to come up with variations to make unique patterns. Wouldn’t these make a super cute gift as well? My girls will be sporting these this fall and winter, too! I may adapt them a bit and make them leg warmers instead of just cuffs. How cute would that be?

Boot Cuffs

I love the combination of sideways rows on top with in-the-round work on bottom. To make legwarmers, I’ll just work more rows of double crochet pairs (Step 8) until I reach the length I like.

I’ve pinned lots of free patterns for boot cuffs, mug cozies, and many other projects to my crochet board on pinterest if you want some more ideas! Happy hookin’!