For the Love of Violet: February Soap Challenge

I have a confession to make. There’s a new love in my life.

Her name is Violet.

20150219-IMG_6760

Violet Rae, our sixth baby girl

She’s less than 2 weeks old, under 10 pounds, and is delectably squishy. You can see some more totally adorable photos here. 😉

Seeing as I’m so enamored with Miss Violet, she’s my inspiration for February’s Soap Challenge Club! And because she’s part of my very DNA, what better technique to use than this month’s challenge, the DNA Helix swirl!?!

I chose to use Nature’s Garden Loving Spell fragrance oil since I seem to be under her spell! It’s sweet, juicy, sparkly, fresh, and intoxicating, just like my Violet. And of course, I used shades of violet to create the soap. Because she’s got the softest, most sensitive skin, I added nourishing ingredients to the soap like tussah silk and colloidal oatmeal. I also added 2 teaspoons of sugar to my lye solution (in the form of a simple syrup) to add bubbles, as well as 2 teaspoons of sodium lactate to add hardness to the soap. Amy’s slow-moving recipe of 35% olive oil, 30% lard, 25% coconut oil, and 10% rice bran oil proved to be ever-so-slow-moving indeed! And the fragrance oil was a breeze to work with; no acceleration or ricing at all. I mixed my lye solution to my oils and fragrance at around 110 degrees, and I had well over half an hour of very fluid soap to play with.

After emulsifying the lye solution and oils, I split the batter into 4 equal parts and colored them with the following: 0.5 tsp lavender oxide, 0.5 tsp lavender oxide and 0.25 tsp black oxide, 2 tsp titanium dioxide, and 2 tsp sparkle gold mica, all dispersed in water.

20150220-IMG_6785

Left to right: deep purple, sparkly gold, lavender, and white soaps

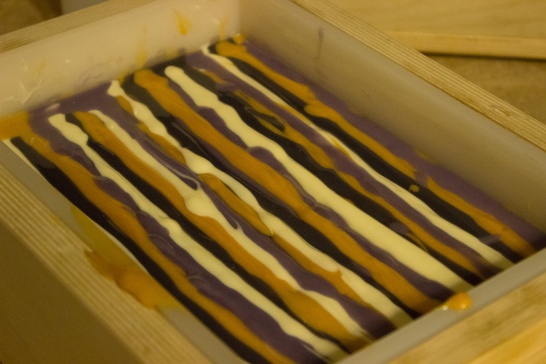
After mixing in the colorants, I poured each color in long s-shaped curves down the length of my smallest slab mold. I filled the entire mold with soap this way, so there should be interesting details throughout each bar. As I neared the final pours, I was sure to carefully make lines to reveal all 4 colors.

20150220-IMG_6784

All soap poured into the mold and ready for swirling

I then inserted a skewer to the bottom of the mold and made very tight s-curves perpendicular to the stripes.

20150220-IMG_6790

The first round of swirling was so beautiful that it was difficult to make myself keep going!

Finally, I made the DNA Helix curve design, again going perpendicular to the stripes I’d just made.

20150220-IMG_6801

DNA Helix swirl design in Love Spell soap. Can you see the helix? Pretty awesome!

The results are stunning! This is a beautiful design technique that I will definitely use again.

20150220-IMG_6793

Love Spell soap in the raw

Since Miss Violet made her appearance, I’m busy trying to find a new normal. I haven’t made any soap until now. In fact, I cut this challenge very close and made this soap late last night! It’ll be in the mold for another day, and I’ll have to post pictures of the bars sometime next week.

20150220-IMG_6811

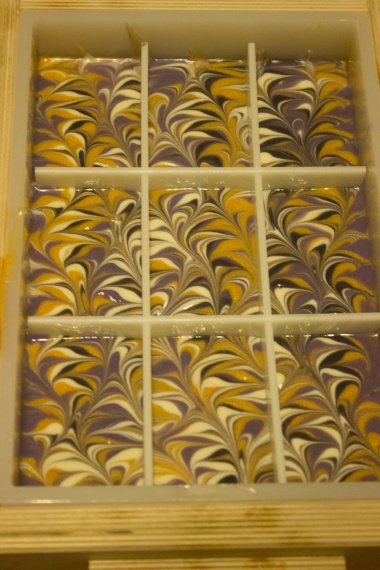
Here it is with dividers in place. Every bar will be so unique!

I’m excited to take a peak at all of the other soapy entries this month. (I made myself wait to look until after I’d made my own!) I’m certain we’ll have some incredible works of art like usual. Thanks, Amy, for another great tutorial! 🙂

Introducing Our Sixth Messy Baby!

We are so incredibly blessed to introduce to you our sixth messy baby girl!

Meet Violet Rae!

20150214-IMG_6671

Violet Rae

Miss Violet was born just over a week ago at the healthy weight of 8 pounds 6 ounces, our biggest baby yet. She’s absolutely perfect in every way with deep blue eyes, lots of dark hair, and delicious cheeks!

20150216-IMG_6710

Precious baby feet

As anticipated, her sisters can’t get enough of her!

20150212-IMG_6604

The triplets are especially fascinated with this new little person!

They constantly give kisses and want to hold her. So far, Lydia (our 2-year-old) has shown no signs of jealousy. The excitement of the bigger girls has rubbed off on her, and she, too, gives constant kisses.

20150209-IMG_6557

Lydia holding Violet for the first time. And Lydia suddenly seems so big!

We’ve captured many of Violet’s sweet sleepy smiles already.

20150214-IMG_6692

Smiling in Meemaw’s arms

And I’ve been having fun setting up photo shoots at home! 🙂

20150216-IMG_6739

Violet at one week old

20150216-IMG_6718

Violet in a violet tutu! 🙂

Yes, the baby messes have begun once again! And not only do I have several loads more laundry each day (how exactly does that happen with the addition of one tiny little person?), but Lydia has also decided that she’s a big girl now, ready to potty on the toilet. She noticed that the baby wears diapers, and she’s not a baby anymore! Translation: Now I have lots of toddler messes to clean up too! She’s doing well with it really, but there have been lots of little accidents here and there to mop up. Oh, the stories I could tell… Six messy babies keep this mama hoppin’!!! And, boy, do I look forward to this:

20150214-IMG_6645

Sweet sleep

In all seriousness, Violet is another miracle to us, a testimony that God is actively involved in our everyday lives. (Check out a little bit of our infertility history here to see what I mean!) SIX GIRLS SIX AND UNDER! Who would have thought?! No, it’s not all sunshine and roses; we’re tired and busy, and Violet can cry with the best of them. But in the midst of it all, I’m trying to enjoy every cuddle, each sweet baby sigh, and all the tender sibling moments. We’re so very thankful for our newest addition, for this precious family that God has given us.

Oatmeal Stout Beer Soap

Lately, I’ve really been into making soap using different liquids instead of just plain water. I do love a good water-based bar of soap, but there’s something intriguing about adding in different milks, beer, yogurt, champagne (like this soap), wine, green tea (check this soap out), coffee, or other liquids. The lather often changes (for the better), as well as the colors and texture of the soap. It’s a bit risky to experiment with, but it’s very rewarding and fun. After making a black lager soap about this time last year, I wanted to try something similar but new. This is my latest creation!

20150130-IMG_6419

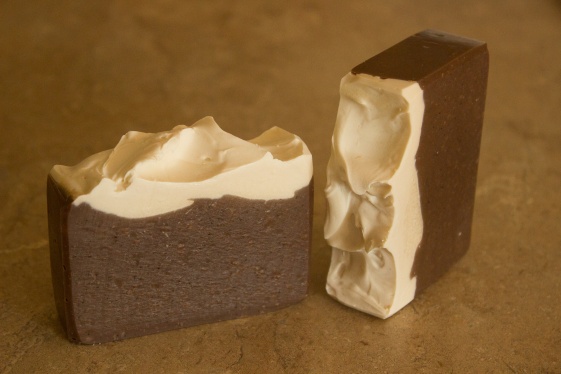
Oatmeal Stout Beer Soap made with beer and finely ground oatmeal

This soap was inspired by an incredible fragrance that I recently purchased from Bramble Berry called Oatmeal Stout. You can’t use that fragrance and NOT use beer as the liquid, right? I opened up a bottle of beer, poured it into my lye pitcher and let it sit open and in the cold for a few days, stirring it every so often, letting it get flat. Then, I made the lye solution by adding in about a tablespoon of lye at a time very slowly. No lye solution volcanoes for me!

I let it cool as I prepped the other ingredients, then carefully poured the beer lye solution into my oils and pulsed the stick blender for about 30 seconds just to emulsify them. After pouring off a few cups of soap to make a frothy white “head” for the soap, I whisked in my fragrance as well as some finely ground oatmeal to the rest of the batter. As expected, the soap got to a thick trace pretty quickly due to the sugars in the beer. The white “froth” on top looked good enough to eat, like a lovely whipped frosting.

IMG_6204

The “head” of Oatmeal Stout Beer Soap in the raw

Within 12 hours of making it, this soap was ready to be cut.

IMG_6220 (2)

Freshly cut, you can see the outside rim of the soap that was most exposed to oxygen already starting to darken.

The base color of the freshly cut soap was a light tan, but I knew that the color would change rapidly due to vanilla content in the fragrance. Just a few days after slicing this soap, it already had a deep brown “stout” appearance.  Pretty cool!

20150130-IMG_6421

Oatmeal Stout Beer Soap

This scent is very complex with notes of rich vanilla and butterscotch, oranges, milky oatmeal, and nutty almond. I literally want to eat this one! Totally delectable. It’ll be ready in just a few weeks, and I’m excited to use it. This is one beer soap that I truly believe will appeal to both men and women. The lather should be super fluffy and luxurious, and with the addition of ground oatmeal, it should also provide a great moisture protection for the skin. Just the thing we need during these cold winter months!

Psychedelic Green Tea Soap

I’ve written several posts about my adventures in the Soap Crafting Club through Bramble Berry. It’s been super fun and I’ve learned so much. (You can check out this beautiful funnel pour soap, this wild avocado soap, a cool tie-dye soap here, a delectable oatmeal cookie layered soap here, and this gorgeous linear swirl soap if you’d like to see them all!)

Way back at the end of September, I received another kit that I have FINALLY gotten around to making!! I watched the live online soap making presentation by Anne-Marie Faiola (the Soap Queen and author of the fabulous Soap Crafting book), read through the recipe several times, and watched as everyone else made their soaps. It just took me a while to actually make it myself!

20150130-IMG_6424

Psychedelic Green Tea Soap

This soap is appropriately named Psychedelic Green Tea, as it calls for freshly brewed green tea in place of water, has green tea extract as an awesome additive, uses an array of green colorants, and of course uses Green Tea fragrance oil. This is a very interesting and unique soap, and I must say it was a rather difficult one for me to make! (This proved to be a very similar experience to when I made avocado soap.)

I received all of the necessary oils, additives, colorants and fragrance, whipped out my lye, scale, and 9-bar slab mold, then brewed some tea. I let the tea cool in my cold garage for most of the day, then I made the lye solution as directed, adding the lye very slowly to the green tea. It turned a deep brown color as expected. Here’s a look at the ingredients and lye solution just before I got started making the soap.

IMG_6180

Melted oils (that I received pre-measured 😀 ), deep brown green tea lye solution, fragrance, green tea extract, colorants and oil to prep them in, and my book laid out for reference

As the lye and oils cooled, I prepped the colorants, got my soaping station all ready, and reread the recipe to be sure I remembered the steps. I added 96 degree lye solution to 108 degree oils, and to my great shock, it was at a medium trace within about 30 seconds of pulsing my stick blender. I did NOT expect that! Especially since I still had fragrance, colors, and additive to add! I was hoping for a nice fluid soap (as pictured in the book) so I could make the lovely intricate swirl design called for. Instead, I ended up with pudding.

IMG_6184 (2)

After splitting off the soap and adding in everything, you can clearly see how thick the soap is.

Despite my pudding soap, I kept whisking and stirring to try to keep it workable. I used spoons and spatulas to plop soap into the mold in s-shapes and stripes, and I pounded to my heart’s content, hoping for no major air pockets.

IMG_6186 (2)

Wow. That’s some thick soap. It’s so much easier to work with when it’s fluid!

I still swirled using the pattern shown in the book. Rather than having a wispy (and flat) soap, I ended up with this lovely textured top! (I’m going for that lemonade from lemons attitude.)

IMG_6188

I was either brave or stupid, but I swirled it as shown in the book!

IMG_6190

I had to work hard to push the dividers into the soap, and I see a few air pockets on top. Fingers crossed that it’s only on top and not through the entire soap!

Though my soap looks very different than the examples, I think it’s still pretty psychedelic! I had to let it sit in the mold for a full week as it was super wet. Even after a week, I had to carefully release the silicone liner and still peeled off a bit of soap. I let it sit in the open air for 2 more days before I removed the dividers.

20150130-IMG_6425

Psychedelic Green Tea Soap. It’s interesting to see the drag marks down every side of this one, and both the top and bottom of the bar have cool designs.

This is certainly an interesting soap (both to make and to look at). It’s a fresh, invigorating scent, and it should be extra nourishing. I’m going to let this one cure for at least 6 more weeks, maybe longer. And I may even cut some of these giant cakes in half, some horizontal cuts and some vertical cuts, to peak at the swirl pattern inside them!

20150130-IMG_6426

Did you notice? No major air pockets in the soap!!! I’m thrilled! 😀

I’ve really had a blast making all the soaps in the 2 sessions of Soap Crafting Club that I joined. Every experience has helped me to learn, for which I am very grateful. I hopped onto the Bramble Berry website this morning and see that the current Winter Crafting Club session is full, but I’m seriously contemplating joining in the Spring Club that starts in May, the one that covers the 3 most difficult techniques in the book. Makes me a bit nervous, but I think I can handle it now that I’ve had so much practice with this club (and with the Soap Challenge Club). It’s so much fun to interact with other soapers and to have the personalized touches and online support that Bramble Berry offers.

Thanks for stopping by! And just FYI, I’ve scheduled a few posts for these next few weeks since (I’m hoping) I’ll be very busy. I’ll let you know when messy baby #6 arrives!